Flappy Bird is a 2013 bird flying game developed in Hanoi by Vietnam-based developer Nguyễn Hà Đông and published by .GEARS Studios, a small, independent game developer also based in Vietnam. It was originally released in May 2013 for the iPhone 5, then updated for iOS6 and later in September 2013. In January 2014, it topped the free category of the American and Chinese iTunes App Stores and later on that month the UK App Store where it was touted as “the new Angry Birds”. It ended January as the most downloaded App on the App Store.
Ref: wikipedia

Download and install Cocos2D 3.x:
This tutorial use the new Cocos2D v3.xframework for iOS.
- Download Cocos2D from here:
http://www.cocos2d-iphone.org/download/Latest versione at this moment was 3.0 RC1 - Open Terminal and go to downloaded file folder
- Write “sudo ./install-templates.sh”
- Open XCode and create “New Project”
- Make a new project!
you should see this screen:

Well, step one passed.
Preparing graphics
You have two ways:
- 1) make your own graphics!
- 2) take screenshots of flappy and edit using Photoshop
I make my own graphics. Here the ZIP file, download and add to your project.
Well, second step done!
Configure project
Change orientation
1) Click on project name, select the Target, and select as Device Orientation, Portrait.
2) In AppDelegate.m uncomment
[code autolinks=”false” collapse=”false” firstline=”1″ gutter=”true” htmlscript=”false” light=”false” padlinenumbers=”false” smarttabs=”true” tabsize=”4″ toolbar=”false”]// CCSetupScreenOrientation: CCScreenOrientationPortrait[/code]
3) Build and Run, you should see something like this:

Remove unused files:
- NetwonConstants.h
- NetwonScene.h/.m
- NetwonSphere.h/.m
- LigthtBulb.h/.m
- Rope.h/.m
next, fix import errors removing all of the code that use these classes.
Clean code:
Open HelloWorldScene.m
1) in init, delete all lines from CCNodeColorto backButton.
2) in touchBegan remove all lines.
Open IntroScene.m
1) Repeat step 1 as above.
How Cocos2D works:
![]()
Before start, I suggest read the new Cocos2D reference.
CCScene: games written in Cocos2D are done using scenes.
CCDirector: it’s the singleton class, responsible for scene executions. Execute one scene at time.
CCLayer: are the scenes layers. Every layer is formed by CCSprite, CCLabel, CCButtons, etc…

Every node has a common class, CCNode.
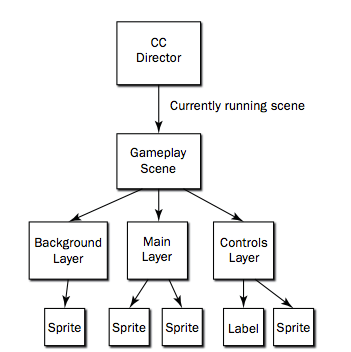
You can define actions, animations, schedule messages and other cool things. You can also, start, resume, pause, end the game.
Note that the coordinate system in Cocos2D is inverted than UIKit.
Coordinate 0,0, is in the BOTTOM-LEFT position!
CLDirector.h contains methods to convert coords as you want:
[code autolinks=”false” collapse=”false” firstline=”1″ gutter=”true” htmlscript=”false” light=”false” padlinenumbers=”false” smarttabs=”true” tabsize=”4″ toolbar=”false”]-(CGPoint) convertToGL: (CGPoint) p;
-(CGPoint) convertToUI:(CGPoint)p;[/code]
Reference here: http://www.cocos2d-iphone.org/

Making main menu:
Now we want to add some resources to main screen, like a start button, a new background, some labels, etc..
What we make:
- a static background
- a scrollable floor
- a scrollable sky with clouds
- game title
- play buttons
- high-score buttons
Open IntroScene.m and in the initmethod, before
[code autolinks=”false” collapse=”false” firstline=”1″ gutter=”true” htmlscript=”false” light=”false” padlinenumbers=”false” smarttabs=”true” tabsize=”4″ toolbar=”false”]return self;[/code]
add the bottom lines, edit sizes, anchorPoint or everything you want.
Add a static background
[code autolinks=”false” collapse=”false” firstline=”1″ gutter=”true” htmlscript=”false” light=”false” padlinenumbers=”false” smarttabs=”true” tabsize=”4″ toolbar=”false”]CCSprite *fxBackground = [CCSprite spriteWithImageNamed:@"MarioBackground-static.png"];
fxBackground.anchorPoint = ccp(0, 0);
fxBackground.position = ccp(0, 0);
[self addChild:fxBackground];[/code]
Add a title
Font is named “Super Mario Bros Alphabet”, you can download it from here: dafont.com
[code autolinks=”false” collapse=”false” firstline=”1″ gutter=”true” htmlscript=”false” light=”false” padlinenumbers=”false” smarttabs=”true” tabsize=”4″ toolbar=”false”]CCLabelTTF *label = [CCLabelTTF labelWithString:@"SUPER TORTOISE BROS."
fontName:@"Super Mario Bros Alphabet"
fontSize:40.0f];
label.positionType = CCPositionTypeNormalized;
label.color = [CCColor whiteColor];
label.position = ccp(0.5f, 0.6f);
[self addChild:label];[/code]
Add Play and Score buttons
[code autolinks=”false” collapse=”false” firstline=”1″ gutter=”true” htmlscript=”false” light=”false” padlinenumbers=”false” smarttabs=”true” tabsize=”4″ toolbar=”false”]CCSpriteFrame *frame = [CCSpriteFrame frameWithImageNamed:@"buttonPlay.png"];
CCButton *playButton = [CCButton buttonWithTitle:@"" spriteFrame:frame];
playButton.anchorPoint = ccp(0, 0);
playButton.position = ccp(30, 120);
[playButton setTarget:self selector:@selector(onSpinningClicked:)];
[self addChild:playButton];
frame = [CCSpriteFrame frameWithImageNamed:@"buttonScore.png"];
CCButton *scoreButton = [CCButton buttonWithTitle:@"" spriteFrame:frame];
scoreButton.anchorPoint = ccp(0, 0);
scoreButton.position = ccp(self.contentSize.width – 130, 120);
// [scoreButton setTarget:self selector:@selector(todo:)];
[self addChild:scoreButton];[/code]
Next, create method for selector onPlayClicked:
[code autolinks=”false” collapse=”false” firstline=”1″ gutter=”true” htmlscript=”false” light=”false” padlinenumbers=”false” smarttabs=”true” tabsize=”4″ toolbar=”false”]- (void)onPlayClicked
{
[[CCDirector sharedDirector] replaceScene:[HelloWorldScene scene]
withTransition:
[CCTransition transitionCrossFadeWithDuration:1.0f]];
}[/code]
Good, you have completed main menu drawing!
Making game screen:
Here we use CCPhysicsNode, to create a physical plan, with gravity and collision detection.
For this example we don’t set particular value for gravity, jump is time-based, not gravity based.
Correct implementation use gravity.
Edit init()
As IntroScene, edit HelloWorldScene.m.
First create the static background, next, create the scrollable backgrounds.
We need two equals background for the floor and two others for the sky and clouds, to simulate infinity scrolling. When first finish, second start and looping:
[code autolinks=”false” collapse=”false” firstline=”1″ gutter=”true” htmlscript=”false” light=”false” padlinenumbers=”false” smarttabs=”true” tabsize=”4″ toolbar=”false”]// bottom
_background1 = [CCSprite spriteWithImageNamed:@"MarioBackground-scrolling.png"];
_background1.anchorPoint = ccp(0, 0);
_background1.position = ccp(0, 0);
[self addChild:_background1];
_background2 = [CCSprite spriteWithImageNamed:@"MarioBackground-scrolling.png"];
_background2.anchorPoint = ccp(0, 0);
_background2.position = ccp([_background1 boundingBox].size.width-1, 0);
[self addChild:_background2];
// top
_backgroundTop1 = [CCSprite spriteWithImageNamed:@"MarioBackground-scrolling-top.png"];
_backgroundTop1.anchorPoint = ccp(0, 0);
_backgroundTop1.position = ccp(0, self.contentSize.height – _backgroundTop1.contentSize.height);
[self addChild:_backgroundTop1];
_backgroundTop2 = [CCSprite spriteWithImageNamed:@"MarioBackground-scrolling-top.png"];
_backgroundTop2.anchorPoint = ccp(0, 0);
_backgroundTop2.position = ccp([_backgroundTop1 boundingBox].size.width-1, self.contentSize.height – _backgroundTop1.contentSize.height);
[self addChild:_backgroundTop2];[/code]
Next, create our physical world:
[code autolinks=”false” collapse=”false” firstline=”1″ gutter=”true” htmlscript=”false” light=”false” padlinenumbers=”false” smarttabs=”true” tabsize=”4″ toolbar=”false”]
_physicsWorld = [CCPhysicsNode node];
_physicsWorld.gravity = ccp(0, 0);
_physicsWorld.debugDraw = NO;
_physicsWorld.collisionDelegate = self;
[self addChild:_physicsWorld];[/code]
Add the top score label:
[code autolinks=”false” collapse=”false” firstline=”1″ gutter=”true” htmlscript=”false” light=”false” padlinenumbers=”false” smarttabs=”true” tabsize=”4″ toolbar=”false”]_score = 0;
_label = [CCLabelTTF labelWithString:[NSString stringWithFormat:@"%d", _score]
fontName:@"Super Mario Bros Alphabet"
fontSize:30.0f];
_label.positionType = CCPositionTypeNormalized;
_label.color = [CCColor whiteColor];
_label.position = ccp(0.5f, 0.9f);
[self addChild:_label];[/code]
And finally… add the turtle!:
![]()
[code autolinks=”false” collapse=”false” firstline=”1″ gutter=”true” htmlscript=”false” light=”false” padlinenumbers=”false” smarttabs=”true” tabsize=”4″ toolbar=”false”]_player = [CCSprite spriteWithImageNamed:@"Tortoise_Green_1.png"];
_player.position = ccp(self.contentSize.width/2, self.contentSize.height/2);
_player.physicsBody = [CCPhysicsBody bodyWithRect:(CGRect){CGPointZero, _player.contentSize} cornerRadius:0];
_player.physicsBody.collisionGroup = @"playerGroup";
_player.physicsBody.collisionType = @"projectileCollision";
[_physicsWorld addChild:_player];[/code]
Note that _player object follow collision! Have a collisions group and type.
Now, we need to animate the backgrounds, then in the – (void)onEnter method, we need to schedule scroll.
[code autolinks=”false” collapse=”false” firstline=”1″ gutter=”true” htmlscript=”false” light=”false” padlinenumbers=”false” smarttabs=”true” tabsize=”4″ toolbar=”false”]- (void)onEnter {
[self schedule:@selector(scrollBackground:) interval:0.005];
}[/code]
…and this is the scroll method:
[code autolinks=”false” collapse=”false” firstline=”1″ gutter=”true” htmlscript=”false” light=”false” padlinenumbers=”false” smarttabs=”true” tabsize=”4″ toolbar=”false”]- (void) scrollBackground:(CCTime)dt
{
_background1.position = ccp( _background1.position.x – 1, _background1.position.y );
_background2.position = ccp( _background2.position.x – 1, _background2.position.y );
if ( _background1.position.x < -[_background1 boundingBox].size.width )
_background1.position = ccp(_background2.position.x + [_background2 boundingBox].size.width, _background1.position.y );
if ( _background2.position.x < -[_background2 boundingBox].size.width )
_background2.position = ccp(_background1.position.x + [_background1 boundingBox].size.width, _background2.position.y );
}[/code]
Repeate the scroll for the sky, if you want a parallax clouds!
Very good, if you Build and Run you should see a lot of new things.
How collision are detected?
It’s incredible, but when objects collide, a delegate was called, this one:
[code autolinks=”false” collapse=”false” firstline=”1″ gutter=”true” htmlscript=”false” light=”false” padlinenumbers=”false” smarttabs=”true” tabsize=”4″ toolbar=”false”]- (BOOL) ccPhysicsCollisionBegin:(CCPhysicsCollisionPair *)pair
monsterCollision:(CCNode *)monster
projectileCollision:(CCNode *)projectile
{
[ self gameOver ]; // or what you want!
return YES;
}[/code]
To treat object as enemies, you need only set collisionGroup and collisionType (like in _player example). When objects are touched, delegate is called.

Game core – logic
Doesn’t exist!
1) The turtle is in the same (x) position for all time.
In screen size / 2 position.
2) Floor and sky scroll continuously, simulating turtle movements (sky is more slow than floor).
3) Tubes are collision object, that scroll at the same speed of floor, and if collides with the turtle, you lost (GameOver screen is loaded).
4) When tube reach half of screen, point label increase by 1.
And the final result…
Super Mario like graphics:
Flappy Bird like graphics:
Note from developer:
This game went up in a couple of hours, in the last night. A lot of things could be done better, surely, but i don’t want to spend more time on this “sample”.
You should consider it as a starting point, nothing else.
Feel free to edit, fix, improve, make money, what you want.
Here the github project, or here full project, ready to download!
Image used in this tutorial, like backgrounds, turtle, tubes, etc, are copyright of ©Nintendo (http://www.nintendo.com/ ). Use is related to this sample.
If you want the UIKit (SKSpriteKit framework, iOS7) version of Flappy Bird, read this tutorial!
Ref: albertopasca.it